Introduction-
Hello everyone! Thank you for reading Suits Avenue’s blog! Today we are going to talk about leather shoes, where they come from, what they’re made of, how they’re made, colored and sewed 🙂 Stick along to get the ins and outs of your new leather shoes! This is a blog that is continues from last week! Make sure to read the whole thing because we have added on! We learned about leather shoes specifically!
Stop into the store today to look at our new pairs!
Table of Contents:
- What is Leather?
- History Of Leather
- Ethics behind leather
- Where is leather produced?
- 5 Types of leather
- The leather we offer
- How to make leather
- Colors leather/ Method 1/ Using Commercial leather dye
- Coloring Leather/ Method 2/ Using Vinegar and Rust
- How to sew leather.
- Difference between hand made and machine made shoes
- Parts of a leather shoe.
- How to make a leather sole.
- How machine made shoes are made.
- How hand made shoes are created.
- Cutting leather parts of a shoe.
- Leather shoe care.
- Conclusion
What is leather?
What is leather? Real leather (not synthetically made) is made from animal skin, and more commonly cow hide, although goat, buffalo and exotic leathers such as snake and alligator are also available.
Here at Suits Avenue we sell Ostrich, cow and elephant leather!
Synthetic Leather:
Synthetic leather, also known as Leatherette, is made by covering a fabric base with a plastic. The fabric can be made of natural or synthetic fiber which is then covered with a soft polyvinyl chloride (PVC) layer. Leatherette is used mainly in bookbinding and was common on the casings of 20th century cameras.
HISTORY OF LEATHER
Tests which have been carried out on historical leather have shown that a wide variety of animals were used for their skin in early times including squirrels, rabbits, beavers, goat, deer, camels and even alpacas. In these times, people would want to use every bit of the animal for food, tools and shelter, which is when they started using animals for their skin. As agriculture and livestock has expanded along with technology, this has paved the way for the development of modern tanning of leather. During the Middle Ages, leather was used for items such as footwear, clothes, bags, cases, trunks and saddles. It was also used for military use and a lot of leather articles were recovered from the Tudor ship the Mary Rose which sank in 1545.
Research has shown that 65% of leather comes from cows while 15% comes from sheep, 11% from pigs and 9% from goats. Less than 0.2% of leather comes from any other type of animal. However, with this in mind, some of the most unique and interesting leather products are created from some of the most unusual and less common hides.
ETHICS:
Leather is used in everything from car seats to footballs and horses saddles and handbags due to its durable nature and finish that is difficult to replicate with synthetic materials. Many consumers are happy to buy products made of leather because it is typically a byproduct of the meat and dairy industries. However, vegans and vegetarians may wish to avoid leather products and opt for a “vegan” leather instead. Although the term “vegan leather” implies an eco-friendly alternative, it should be noted that some vegan leathers can cause more danger to the environment than real leather.
WHERE IS LEATHER PRODUCED?
At present, the top six countries producing tanned leather are: China, Italy, India, Brazil, Korea and Russia. Hides are often acquired from animals in these countries and are then shipped to other countries to be processed. For example, a company in the UK might buy leather from China and ship them in a refrigerated container to somewhere such as Italy where they are famous for their tanning methods and then re-import the finished leather back to the UK before selling it. Despite some other countries being better known for their production of leather, 80% of the world’s leather products are now made in China.
“The 5 types of leather”
1. Full Grain or Top Grain Leather – ( ” the best ” )
This is the upper layer of a hide which is split into layers by a splitting machine to various thickness. This outer layer will show natural scars and haircell patterns if left as uncorrected natural grain. The thickness can vary depending on the gauge set at the time of splitting and the application. Thereafter the hides can be colored & given various protective finishes. Whether produced for Upholstery, Garment, Shoe or Saddlery, these are the best types of leather as they are the strongest and most durable and valuable layer of hide.
2. Corrected or Embossed Grain – ( ” 2nd best ” , full grain)
Hides which have an excessive amount of scratches or scars are further processed by “correcting” the natural grain of a Full Grain skin. After splitting to the required thickness, this natural grain is buffed or sanded and replaced with an embossed grain and finish to simulate various hair cell patterns. The resulting effect will look flawless with no natural scars showing, but this is no longer the real or natural grain. The original feel or hand of the natural skin and durability is also reduced with a synthetic grain and finish. Many applications for shoe and handbag leather are embossed with unique exotic prints to simulate the look as well. This process is utilized in many Garments and Upholstery while still represented as “full grain leather” which technically it is that layer.
3. Split Suede – ( “functional and inexpensive leather hides” )
The second layer or lower layer of the skin left after removing the Full Grain layer is the Split Suede and will be suede on both sides. These types of leathers also will come in various thickness depending on application. As this is a byproduct of hide tanning it is less costly and therefore utilized in products where Full Grain is not required such as tool pouches, moccasins, suede garments etc.. This layer of the skin can also be further processed by the application of a synthetic finish and hair cell to one side of the suede to create an artificial look of Full Grain leather, known as “finished split” hide. This is used extensively in lower cost furniture and garments and represented as “Genuine Leather” which technically it still is although it may look like something it is not.
4. Nubuck Sueded Grain – ( “look but don’t touch – very sensitive leather”)
This Full Grain layer of the skin is given a suede effect by lightly sanding the natural grain to open the hair cell and results in a velvety suede feel. This is also correcting imperfections in the natural grain and although soft to the touch, it is a sensitive effect. Care must be taken against soiling or staining as it is very difficult if not impossible to clean afterward. This effect is utilized in many garments and Upholstery products.
5. Reconstituted, Bonded or Fibre Leather – ( “Recycled, particle board” )
Here leather remnants and scraps from garment and shoe factories are ground up and recycled. In these types of leather the fiber particles are bonded with adhesive into a fabric followed by the application of a synthetic grain, hair-cell pattern and finish. This material will have a suede back and looks of smooth Full Grain leather , while it is essentially Particle board leather. As it is comprised of at least 51% leather fiber, it is represented as “Genuine leather” and utilized in many low priced garment and upholstery finished products. BUYER BEWARE – ASK QUESTIONS FIRST!
The Leathers we offer:
Ostrich Leather:
Ostrich leather is highly durable which has a uniquely bumpy texture, referred to as quills, that makes ostrich skins a prime choice for elegant leather products. We only stock and wholesale industry standard size South Africa origin and processed full body ostrich skins and legs. Our Ostrich body sizes are 16.5 square foot on average with only the center and neck containing 7 square foot of premium quill. Please adjust your required usage of desired quill in your design when ordering. Our ostrich leg and ostrich body skins are the best in the international marketplace and are the exact same finished ostrich skins sold throughout Italy as the premier in luxury and sold at over $400 per skin. We currently have a United States revolving stock of 10,000 skins in 75 colors and finishes. Ostrich skins are used to produce a variety of men’s and women’s products , like ostrich skin wallets, garments, wall covering, furniture, handbags, motorcycle seats, saddles, iPad and iPhone cases, business products, and more.

ELEPHANT LEATHER:
Elephant hides are a thick and durable hide with a deep, distressed wrinkled texture. The elephant skins are extra wide hides known as “panels”. With an average of 20 sq. ft. of material, elephant skin panels are great for applications with wide applications where a thicker hide is preferred over a thinner skin or where the use of small skins will require significant seaming.
As with all of our materials, our African elephant hides are legally imported, abiding by the CITES rules and regulations. All of our skins are thoroughly inspected in our U.S. locations prior to shipping

Types of Cow Leathers:
HOW TO MAKE LEATHER:
To get from a salted hide to a piece of leather ready for use in a sofa takes 10 working days!
The steps below show you what tanneries have to do to turn hides into leather :-
Curing
Raw hides and skins must be preserved to stop them deteriorating before the leather-making process can begin. Methods of preservation include salting, chilling, freezing and the use of biocides.
Soaking
Cured hides or skins are soaked in water for several hours to several days. This allows them to reabsorb any water they may have lost in the curing process or during transportation. It also helps to clean them of salt and dirt.
Painting
Painting is a method by which wool can be removed from sheepskins using a sulphide based mixture.
Liming
Liming removes the epidermis and hair. This also results in alkaline swelling of the pelt to cause a controlled breaking of some of the chemical crosslinks of the collagen .
Fleshing
After liming the pelt is passed through a machine to remove fleshy tissue from the flesh side. Hides may be split into layers at this stage or after tanning.
Deliming
The principal action of deliming is to gradually neutralise the alkali in the pelt, avoiding rapid changes in pH which could lead to distortion or disruption of the tissues.
Bating
A long delime can significantly improve the removal of any remaining lime, scud (miscellaneous debris) and residual components broken down during liming. Bating – based on the use of enzymes – completes this process so that the pelt is flat, relaxed, clean and ready for pickling and tanning.
Pickling
Weak acid and salt solutions are used to bring the pelt to the weakly acid state required for most tanning processes. Stronger pickling solutions are used to preserve pelts so that they can be stored or transported in a stable form over periods of several months.
Degreasing
Solvents or water-based systems can be used to remove excess grease before tanning.
Tanning
Tanning converts the protein of the raw hide or skin into a stable material, which will not putrefy and is suitable for a wide variety of purposes. Tanning materials form crosslinks in the collagen structure and stabilise it against the effects of acids, alkalis, heat, water and the action of micro-organisms. The main types of tanning materials are :
Mineral tannages
Most leather is tanned using salts of chromium.
Aldehyde and oil tannages
Tanning with aldehydes and oils produce very soft leathers and this system can be used to produce drycleanable and washable fashion leathers and also chamois leather.
Vegetable tannages
Various plant extracts produce brown coloured leathers which tend to be thick and firm. This type of tannage is used to produce stout sole leather, belting leather and leathers for shoe linings, bags and cases.
Splitting
A splitting machine slices thicker leather into two layers. The layer without a grain surface can be turned into suede or have an artificial grain surface applied.
Shaving
A uniform thickness is achieved by shaving the leather on the non-grain side using a machine with a helical blades mounted on a rotating cylinder.
Neutralisation
Neutralising removes residual chemicals and prepares the leather for further processing and finishing.
Additional tanning material may be applied to give particular properties which are required in the finished leather.
Dyeing
The dyeing of leather into a wide variety of colours plays an important part in meeting fashion requirements. Some leathers are only surface dyed, while others need completely penetrated dyeings, as is the case with suede leathers.
Fatliquoring
Fatliquoring introduces oils to lubricate the fibres and keep the leather flexible and soft. Without these oils the leather will become hard and inflexible as it dries out.
Samming
This process reduces water content to about 55% and can be achieved by a number of machines, the commonest being like a large mangle with felt covered rollers.
Setting out
The leather is stretched out and the grain side is smoothed. This process also reduces the water content to about 40%.
Final drying
Leather is normally dried to 10-20% water content. This can be achieved in a number of ways and each method has a different effect on the finished leather:
Staking and dry drumming
A staking machine makes the leather softer and more flexible by massaging it to separate the fibres. To finish off the leather may be softened by the tumbling action inside a rotating drum.
Buffing and Brushing
The flesh surface is removed by mechanical abrasion to produce a suede effect or to reduce the thickness. In some cases the grain surface is buffed to produce a very fine nap, e.g. nubuck leathers. After buffing the leather is brushed to remove excess dust.
Finishing
The aims of finishing are to level the colour, cover grain defects, control the gloss and provide a protective surface with good resistance to water, chemical attack and abrasion.
Final grading
Leather will be graded before despatch to the customer. This grading may consider the colour intensity and uniformity, the feel of the leather, softness, visual appearance, thickness, design effects and natural defects such as scratches.
TREATMENT AND PRESERVATION
As leather is a natural product, it is important to preserve and condition it. There are many products you can buy which will lengthen the life of leather. Those that have been treated with acid are more prone to red rot which cause changes in the texture of the leather. Although this change cannot be reversed, treatments can be applied to stop it from becoming too damaged.
COLORING LEATHER: – METHOD ONE – USING COMMERCIAL LEATHER DYE

1. Choose your leather dye. Most commercially prepared leather dyes come with leather preparer, the dye itself, and a finish (such as leather sheen). Consider the following when choosing a dye:
- Alcohol-based dyes stiffen the leather, while water-based dyes leave it soft and supple. Many water-based dyes are actually coatings, which can completely change the color of the piece.
- The color of the dye is not representative of the final color. Test on a small sample first. If you are touching up an already dyed piece, use a color-matching service to get an exact match.
- Dyes can be spray-on, paint-on, or sponge-on. Choose the type that works best for you in terms of ease of use.
2. Tape off any area that you do not want dyed. Cover any buckles or metal pieces that you do not want dyed with masking tape. The tape may damage the leather finish, but you’ll be removing that anyway to make the surface available for dyeing.
3. Move to a well-ventilated area. Most leather preparers and leather dyes release fumes that are unhealthy to breathe. Work in a space with good ventilation. If dyeing your leather outdoors, keep it out of direct sunlight and extreme heat.
- Most dyes give best results at air temperatures of 60ºF (15ºC)
4. Protect your hands and floor from stains. Leather dye can stain skin for a week and other surfaces permanently. Wear two pairs of latex or nitrile gloves. Lay down plastic drop cloth to catch spills.
5. Apply the leather preparer. Rub the leather preparer or de-glazer on with a clean cloth. This removes the leather finish so the dye can penetrate evenly into the material.
6. Wet the leather. Use a spray bottle filled with water to dampen the surface of the leather. Do not over-saturate the leather, but make sure you have an even covering. This helps the leather absorb the dye evenly, resulting in a smooth finish.
- Some leather dyes do not require this step. Check the label.
7. Apply your first coat. Start by painting the edges with a paintbrush. For the rest of the job, apply the dye in a thin coat using a sponge, wool dauber, paintbrush, or sprayer. Check the dye label to see which tool the manufacturer recommends, or weigh the following pros and cons:
- Sponges can apply a special affect or texture to the leather. Apply in a circular motion for an even look.
- Wool daubers are easy to use when applying liquid dye to small areas. They may not work well with gel dyes.[2]
- Paintbrushes are good for edges and small areas, but it is hard to hide the brush strokes over large areas. Apply the first layer left to right, the second up and down, and the next layer in circular motions to ensure even coating.
- Sprayers makes it easy to blend colors for repairs or multi-color dye jobs. An airbrush or touch-up spray gun provides the most control.[3]Check the dye instructions to see if it is suitable for spraying.
8. Apply additional coats of leather dye. Let the first coat dry a little, then apply another one. Repeat with additional coats of leather dye until it reaches the desired color, usually after three to six coats.[4] Applying several thin coats makes it easier to achieve a uniform color.
9. Allow the leather to dry completely, manipulating it periodically to keep it supple. Allow the leather to dry for at least 24 hours. Pick it up and flex it occasionally (wearing gloves) to prevent it becoming rigid. The leather may feel sticky at first, but this should disappear after buffing or applying leather sheen.
10. Buff the leather with a clean cloth or apply leather sheen. Buffing with a cloth removes any dye residue and polishes the surface of the leather. You may use leather sheen to leave a shiny finish on the leather.
COLORING LEATHER: – METHOD TWO – USING VINEGAR AND RUST
- Use vinegar and rust to dye leather black. This old-fashioned recipe, called vinegaroon or vinegar black, is a cheap and easy way to permanently dye your leather dark black. The color will not rub off onto fingers or clothes, and you can save the leftover dye for later use.[5]
- This method works best on vegetable-tanned leather (or antique pit-tanned leather). If the leather is already dyed, it was probably chrome-tanned and sealed, and vinegaroon will not give good results.
2. Choose a source of rust. You can use uncoated iron nails, iron shavings, or any other material that will rust (and ideally has already started to rust). Steel wool is one of the fastest options, since you can tear it into small fragments, but it has an oil coating to prevent rust. Get rid of this first by dunking the steel wool in acetone, squeezing it out, then letting it dry completely.[6]
- Acetone can irritate skin, but occasional contact shouldn’t cause lasting harm.[7]Wearing latex gloves is recommended.[8]
3. Warm the vinegar. Heat about a half gallon (two liters) of white vinegar or apple cider vinegar until it is hot, but not too hot to touch.[9] Pour it back into the container it was sold in, or into any convenient container.
4. Drop the metal into the vinegar. Over time, the rust (iron oxide) will react with the vinegar (acetic acid). This form a substance called ferric acetate, which reacts with tannins to dye the leather.[10]
- The amount of iron to add depends on the concentration of the vinegar. The easiest approach is to start with a large quantity (thirty nails, as a ballpark estimate), then keep adding metal until it stops dissolving.[11]
5. Keep in a warm, ventilated container for at least a week. Punch a hole in the lid to let off gases, or the container could explode. Close the lid and put the container in a warm location for at least a week or two. The “vinegarroon” is ready when the iron is dissolved and there is no strong vinegar smell.[12]
- If it still smells strongly of vinegar, add more iron. If there’s already iron in there, heat over the stove to speed up the reaction.
- Once almost all of the acetic acid is gone, any remaining iron will rust normally, turning the liquid reddish. At this point you can leave the lid off for a couple days to help the last dregs of the acetic acid evaporate.
6. Filter out the liquid. Run the vinegaroon through paper towels or coffee filters repeatedly until the liquid is free from solids
7. Soak your leather in black tea. Brew an extra-strong black tea, then let the water cool. Soak the leather in it to add extra tannin. This will improve the effects of the vinegaroon, and help prevent cracking.[14]
- Professional leather workers sometimes use tannic acid or logwood extract instead.
8. Soak the leather in vinegaroon for thirty minutes. The liquid will penetrate into the leather and add a deep, permanent dye. Don’t be alarmed if the color looks grey or bluish. It should deepen to black during the process, and become darker after oiling.
- It’s a good idea to test a similar piece of scrap leather first, or one corner of the object. If it cracks after a couple days, dilute the vinegaroon in water and try again.
9. Neutralize the leather using a baking soda solution. Mix 3 tbs. (45 mL) baking soda in one quart (1L) of water. Saturate the leather with the solution and then rinse with clean water. This neutralizes the acid in the vinegar solution to keep your leather from disintegrating later on.
10. Condition the leather using oil. While the leather is still damp, rub your favorite leather oil over the surface. You may need two coats of the oil to fully condition the leather. Choose the oil that works best for your leather product by testing on a small portion of the leather.
Click here to read our complete suits guide!
How to hand Sew leather:
Step 1: Using Rubber Cement
To get started on hand-sewing leather, I like to use rubber cement; it helps hold the leather together while sewing, but it offers a light enough bond to allow a second chance to line things up to precision (which isn’t always the case with other types of glue). Apply a light coat of rubber cement to both pieces of leather, then press them together when the cement is nearly dry.

Step 2: Work a Groove Into the Leather
Now that you have things secured in place, put a groove on the leather with a stitching groover. This tool does two things: It presents a nice straight line to stitch on and removes a small amount of leather to provide a trench that the stitch can sink into, which can help protect the thread.

Step 3: Mark Stitch Spacing
Utilizing the groove you just made, use an overstitch wheel to mark the thread spacing. As it’s name implies, this craft tool marks exactly where to stitch and creates a shallow channel to sink your stitches further into the leather. Overstitch wheels come in different sizes that vary the spaced length of your stitching. We’re using a number six size in this sewing tutorial. If you’re unsure of which size to use, remember this rule: the number refers to the amount of stitches per inch.
Step 4: Use a Stitching Awl
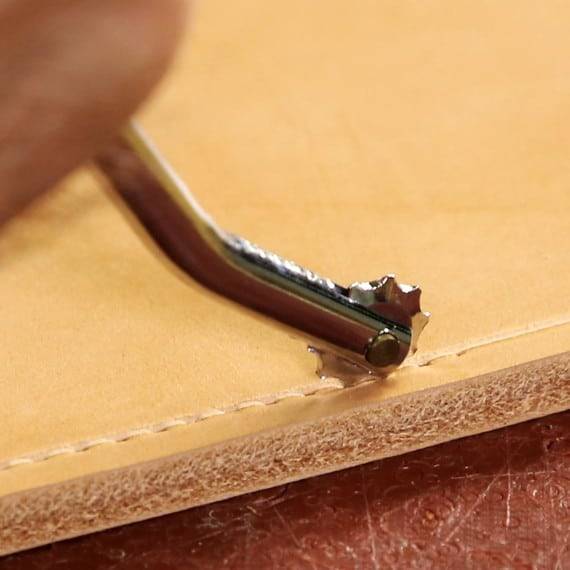
Create holes for sewing into the leather. A stitching awl, used here, is the best tool for the job. The awl is reminiscent of an ice pick, but it has a diamond-shaped blade with sharp cutting edges to pierce holes into the leather rather than tear holes, as a round metal point would. When using it, pierce through the leather on each of the dots created by the overstitch wheel. Make sure that you keep the awl at a 90-degree angle when piercing the leather to ensure that the spacing is consistent on each side for uniform stitching.

Step 5: Lock the Needle
For any hand-sewn leather project, you will need a length of thread that measures three times the area coverage. For the saddle stitch, you will use two needles: one on either end of the thread. Here’s a trick I like to use when sewing leather: lock the needle into the thread. To do this, run the waxed thread through the needle eyelet then pull it through further by about an inch. Next, pierce the thread with the needle point (as shown) and push this loop around the needle upwards towards the eyelet. With end of the thread that initially passed through the eyelet, pull out the slack that was created with this adjustment. Holding the needle, pull the loop over the eyelet to lock the needle in place. By securing the thread this way, you won’t have to worry about it sliding off of the needle while you sew. Repeat on the other end so you have two needles on the thread, one on each end.
In the following steps, I will be using a stitching pony to help with the process. This model pictured here features a wooden “turn- key” with jaws that hold the leather in place while stitching and ensures a stable work station. This is an optional accessory, however it is handy to have around as an extra hand to help hold the project in place while working on it

Step 6: Start to Stitch
To begin your stitch, sew through the first hole, making sure the lengths of thread are even on each side. Continue to sew through the same hole with both needles, each time passing through the same hole from opposite sides. Continue this back-and-forth sewing technique, pulling the thread snug with each pass, until you have reached the end of your project. If you are having difficulty with the needles getting stuck in the leather, try widening the holes further with the stitching awl or using a pair of needle-nose pliers to help pull through the leather.

Step 7: Lock the Stitch
When you have completed your stitching, you will want to lock the stitch in to place. Sew back a few stitches, pull the thread down snug, and cut the thread flush against the project.

Whats the difference between hand made and machine made leather shoes?
#1 Quality of leather
A pair of regular formal shoes is made of synthetic or cheap quality leather which will not last long. Poor quality leather cracks or splits over a period of time and does not mould your feet properly. However, if you pay a little more, you can buy these handmade shoes made of premium quality Italian calf leather which will last for years and keep looking good.
#2 Type of sole
The sole used in most shoes is manufactured locally which may not be that good in terms of comfort for your feet. These handmade shoes are made of Argentina leather sole which is considered as the finest quality leather in the world.
#3 Regular shoes vs premium shoes
Each and every component of the shoe right from the lining to the tongue and the socks of these shoes are made of real leather. This is what makes these shoes actually very long lasting.
#4 Factory vs Workshop
The handmade shoes have better strength and durability as compared to a machine made shoes. The craftsmen who make these shoes spend a lot of time on making a pair whereas machine made shoes are manufactured in a bigger quantity which makes the difference.
#5 Machine vs Hands
A pair of shoes goes through several stages of manufacturing. Handmade shoe makers let the shoes rest and breathe between these stages which results in superior fit, quality and looks whereas machine made shoes are infused with stiffeners to speed up the production process which is a compromise on quality.
Parts of the shoe:

- Eyelet
The small metal ring that reinforces the lace hole and stops it from wearing away. - Heel
The thick piece of leather or rubber that’s attached to the sole of a shoe to raise and support the back of the foot. Dress shoestend to have a separate heel piece, which can be replaced if necessary. Contemporary designs often use a wedge-shaped rubber sole that does away with the need for a separate heel. - Heel cup
A semicircular piece of leather or other sturdy material that is stitched or glued over the back of a shoe’s quarter (see below) in order to reinforce the heel area, which tends to experience the most strain (alongside the toe) in the course of a shoe’s general wear and tear. - Quarter
The back part of the upper, typically beginning where the vamp (see below) finishes, and wrapping around the heel. If the shoe is whole cut, the quarter and vamp will be the same piece of material. In most shoes, however, they are two separate pieces of leather. - Sole
The piece of hard material on the bottom of the shoe. This can be leather – which is more breathable but also more vulnerable to moisture and water damage – or rubber – which offers some protection against the elements, but is less formal. - Toe cap
A piece of leather (or other material) that is stitched or glued to the toe of a shoe. This helps to reinforce this often strained area, but it can also make for a nice graphic accent. - Tongue
The flexible piece of material that sits underneath the laces and quarter of a shoe. This helps to spread the pressure of a shoe’s closure across the foot. - Topline
The uppermost edge of the quarter at the back of the shoe (i.e. where the hole is for your foot). On sneakers, this is often called the “collar”. - Top piece
A thin layer of leather or rubber attached to the bottom of the heel. It is the bit that touches the floor. - Upper
A word used to designate the entire top half of the shoe that covers the foot, including the vamp and quarter. It is attached to the sole with either glue or nails. - Vamp
The front section of a shoe’s upper, which typically stretches from the toe to the middle of the foot, where it meets the back part or quarter. - Welt
The thin strip of leather that runs around the edge of the sole (which juts out slightly on a dress shoe). The purpose of this is to fasten the upper to the sole.
How leather shoes are machine made:
The machines are programmed to know what to do ahead of time. They go from machine to machine, the leather being measured, cut, and sewn together.
Leather shoes hand sewn:
The measurements are marked on the leather hide, they are then hand cut and sewn together to make the shoe. They use a foot base to help shape it together.
How to make Leather Soles:
Place a sheet of paper on the floor. Stand on the paper with your feet apart, and have a friend help you trace around the outsides of your feet.
Draw over your tracing lines, refining the foot shapes so that they are smooth and do not show any individual toes. Cut the traced soles from the paper.
Lay the sole patterns on top of a piece of medium-weight leather. Secure them to the leather using pins.
Cut around the edges of the pattern pieces so that you have identical leather versions of your patterns.
Attach the leather soles to your chosen shoe tops by stitching the soles to the shoe tops with a leather sewing needle.
Cutting leather parts of a shoe:
The leather parts of the shoe are cut down from a bigger hide. Each shoe has it’s own measurements, unique to the brand!
Leather Shoe Care:
Cleaning:
Clean and apply conditioner to your shoes once a month. First remove dirt with a nylon medium-bristle brush and a capful of Woolite diluted in a bowl of warm water.
After conditioning your dress shoes, polish with a neutral shoe cream. Work the cream over the leather with your fingers and let it sit for three minutes. Then use a horsehair shine brush to polish and remove excess cream.
For a high shine, use a wax paste instead of shoe cream. “Rub the wax on, let it dry 15 seconds, and buff it off.” Get a paste that matches the color of your leather. To prevent a black streak of polish showing up on your brown shoes, use a different brush for each color. If you have three colors, get three brushes. Wax, however, clogs the leather’s pores, making it dry out faster
Water Protecting & Repair:
Every three to six months, add a waterproofing spray after conditioning a pair of shoes. “They need just a very thin coat, one delicate shot right over them.” If you see water stains on unprotected shoes, misting the entire shoe with water may help even out the color by changing it to match the stain.
Extra:
- Help maintain the shoe’s shape, and soak up lingering sweat or rain, with cedar shoe trees.
- Store your shoes in cloth shoe bags to keep them from getting dusty.
- If your shoes get soaked, air-dry in a spot with good airflow. While drying them over a vent works, the quick change from soaked to hot can dry out your leather and require more conditioner.
Conclusion-
Thank you for reading Suits Avenue’s blog! Today we talked about leather shoes, where they come from, what they’re made of, how they’re made, colored and sewed 🙂
Stop into the store today to look at our new pairs!
“THEY HELPED ME MATCH SHIRT AND TIE… I FEEL CONFIDENT.”
MUGISHAAttoreny
“THESE GUYS ARE THE BEST IN TOWN, REAL REAL IMPORTED CLOTHES”
KITAKUYIOffice
I am slide content. Click edit button to change this text. Lorem ipsum dolor sit amet, consectetur adipiscing elit. Ut elit tellus, luctus nec ullamcorper mattis, pulvinar dapibus leo.
John DoeCEO
30 days before wedding Suits Avenue saved my neck, QUALITY and customer care
RobertCEO
The gals made look smart for my job interview..AND i won the position…Thx Suits Avenue
SimonEmployeed
Find us, Follow us, and like us on FACEBOOK for latest fashion Trends…
Click and SHARE…We would love to help your friends look smart…🕺💃
Valuable Article
Valuable Article