

Hi Everyone and thank you for stopping by Suits Avenue’s Blog page!
Have you ever had that one special event that you were so excited for…you start crossing the days off your calendar, checking the countdown you how downloaded on your phone every 15 minutes as if that’s going to take the days away…but then that day finally comes and BAM just like that all your excitement is gone…. you don’t know how to tie your tie.
Well worry no more! In today’s blog, we are going to walk you through simple step-by-step guides to tying your own tie.
The first tie we are going to discuss is the Prince Albert. We teach men who come to our store this specific knot because its quick and simple leaving your perfect day hassle free.
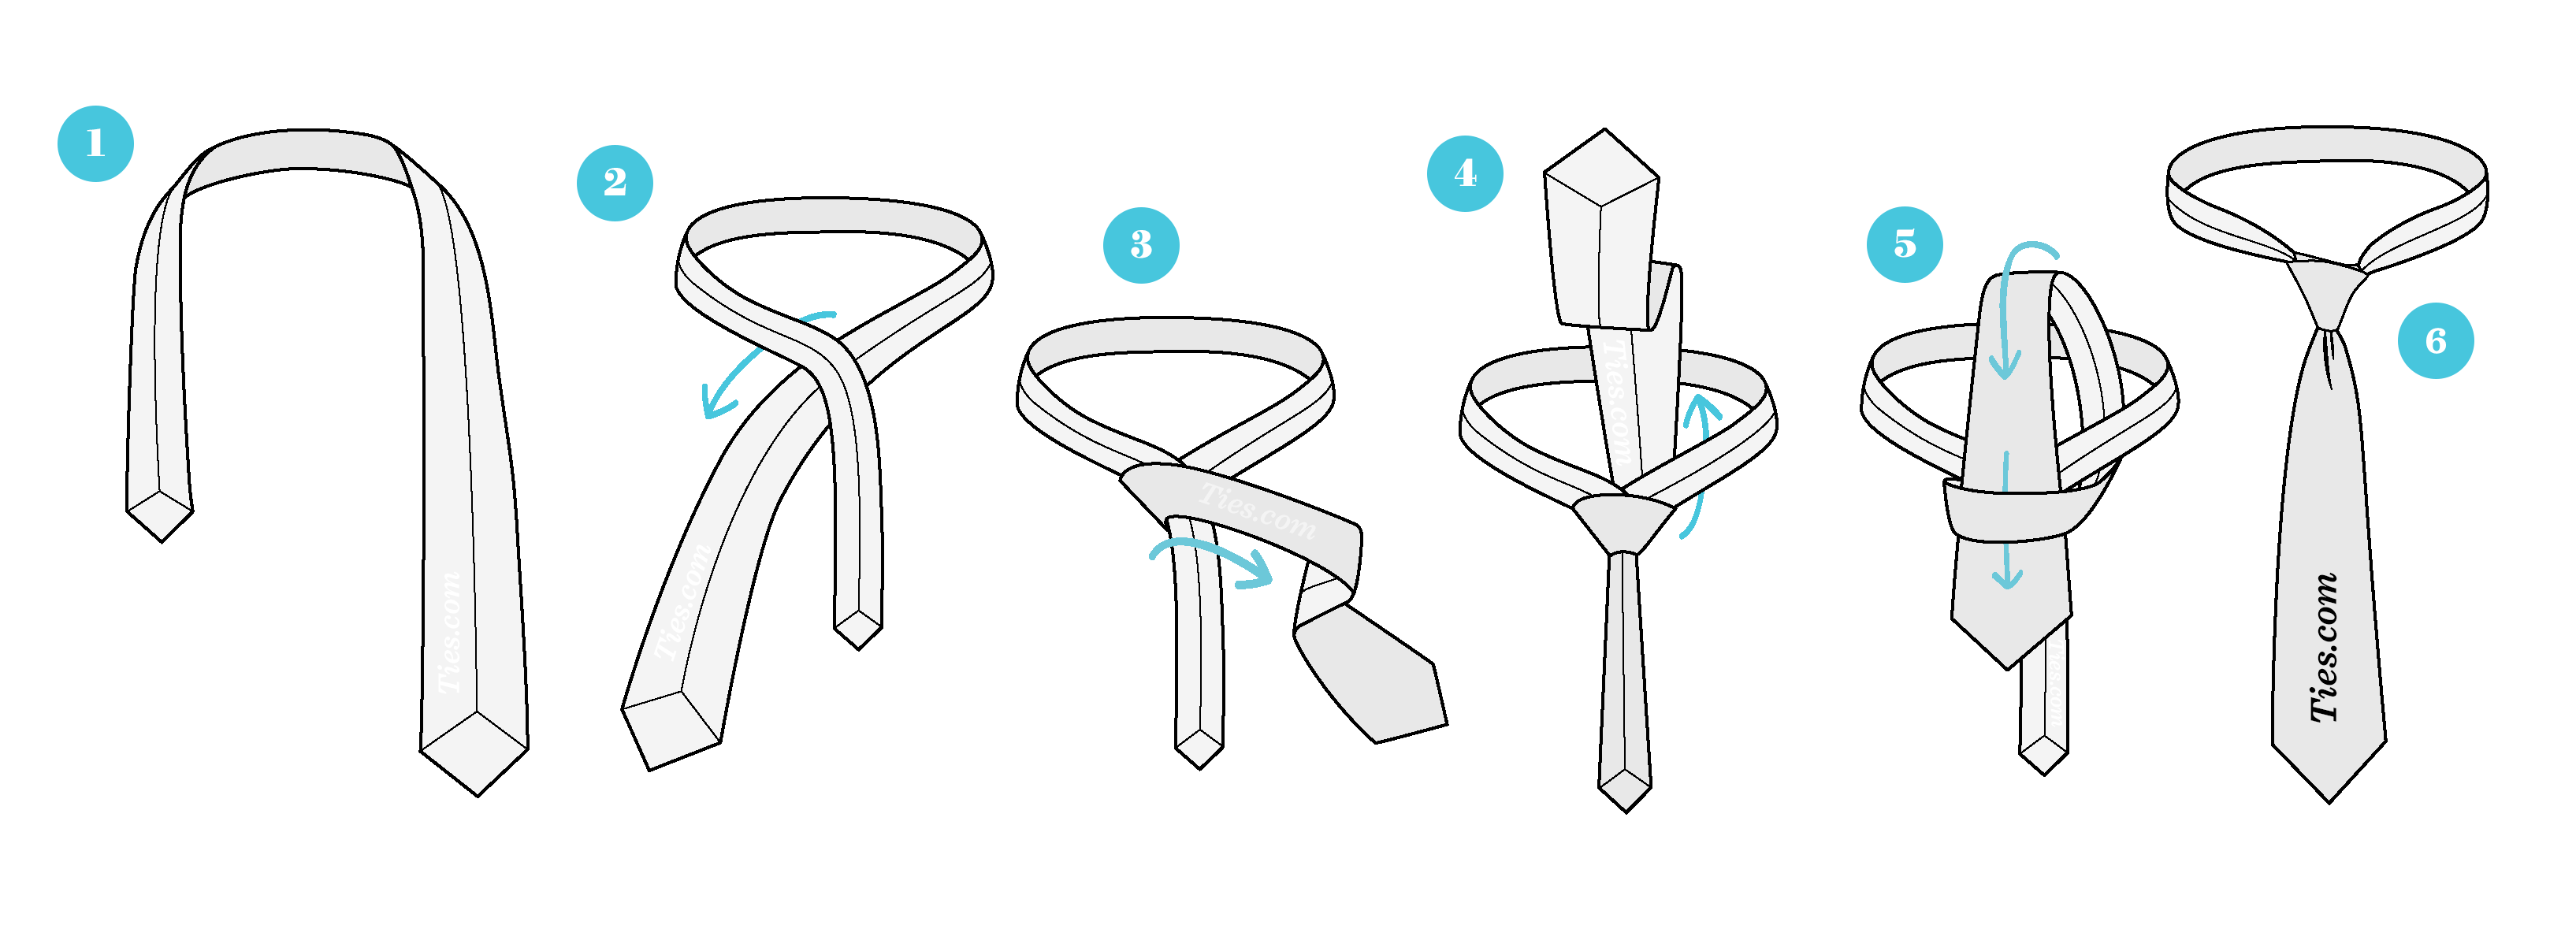
Prince Albert

Knot Size: 3/5 Symmetry: 2/5 Difficulty: 3/5
Step-by-step how to tie the Prince Albert knot:
- Start with wide end on right slim on left
- Move the wide end from the right to the left
- Move the wide end under the small end and to the right
- Move the wide end across the front and to the left
- Move the wide end under the small end and move the knot up while pulling the smaller side down and it will tighten.. you are now complete with the Prince Albert Tie.
Half Windsor

Knot size: 3/5 Symmetry: 3/5 Difficulty: 3/5
Step-by-step how to tie the Half Windsor Knot:
- Start with wide end of the tie on the right and the skinny side on the left
- Move the wide end over the small and to the left
- Move the wide end under the small end and to the right
- Move the wide end up the center, towards the neck loop
- Move the wide end through the neck loop and to the left
- Move the wide end across the front and over to the right
- Move the wide end up into the neck loop from underneath (This will create a loop)
- Move the wide end down through the loop just created in the front
- Tighten the knot by pulling down on the wide side and pushing the knot up…. you have now completed the Half-Windsor
🤵Click here to learn how to dress for an interview🤵
Windsor

Knot Size: 4/5 Symmetry: 5/5 Difficulty: 2/5
Step-by-step how to tie the Windsor knot:
- Start with the wide end on the right and the skinny end on the left.
- Move the wide end over the small end and to the left
- Move the wide end up into the neck loop from underneath
- Move the wide end now down through that neck hole and to the left
- Move the wide end around the back of the small end and to the right
- Move the wide end to the center towards the neck loop
- Move the wide end through the neck loop and down to the right
- Move the wide end across the front to the left
- Move the wide end up and into the neck loop from underneath (This will create a loop)
- Move the wide end down through the loop just created in the front
- Tighten the knot by pulling down on the wide side and pushing the knot up… you have now completed the Windsor Knot
🤵 Now that you know how to tie a few knots- click here to learn how to match your tie with your suit! 🤵
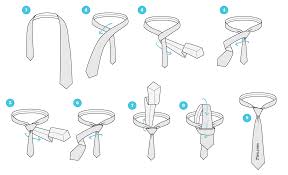
Simple knot/ Oriental Knot:
Knot Size: 1/5 Symmetry: 4/5 Difficulty: 1/5
Step-by-step how to tie the simple knot / oriental knot:
- 1. Start with the backside of the tie facing away from you, the wide end is on the right and the small end is on the left. The tip of the small end should rest slightly above your belly-button (this will vary depending on your height and the length & thickness of your tie). Move only the active (wide) end.
- 2. Wide end under the small end to the left.
- 3. Across the small end to the right.
- 4. Up into the neck loop from underneath.
- 5. Down through the loop you’ve just made in the front.
- 6. Pull down on the wide end to tighten. Slide the knot up to adjust.
The Four in Hand knot:

Knot Size: 2/5 Symmetry: 3/5 Difficulty: 1/5
Step-by-step how to tie a four-in-hand knot:
- 1. Start with the wide end of the tie on the right and the small end on the left. Begin with the small end slightly above your belly-button (will vary depending on your height and the length & thickness of your tie). Only move the active (wide) end.
- 2. Wide end over the small end to the left
- 3. Under the small end and to the right
- 4. Across the front and to the left
- 5. Up into the neck loop from underneath
- 6. Down through the loop you’ve just made in the front
- 7. Tighten the knot by pulling down on the wide end. Slide the knot up & adjust.
For other GREAT how-to tips on tie tying visit
Stop on in the store today and we can help you tie your tie!!!
⬇Fill out the form below for any other questions! ⬇
The only sites we used when creating this blog were…
https://www.ties.com/how-to-tie-a-tie/simple


The Must-Have Fashion Trend for Kampala’s Style-Conscious Men Blazers in Kampala | Suits Avenue
The Must-Have Fashion Trend for Kampala’s Style-Conscious Men Blazers in Kampala | Suits Avenue WhatsApp Us Now 🔥Blazers: The New Social Media Fashion Statement for

The Ultimate Guide to Navigating Smart Casual: A Style Guide for Men in Kampala
The Ultimate Guide to Navigating Smart Casual | Suits Avenue WhatsApp Us Now 🔥Introduction to Smart Casual. https://videos.files.wordpress.com/B95D28Pq/sa-absync-general-shop-video-11labs-vo-yt-music-march-10th-2026.mp4 March 18th 2024 In the bustling city

Elevate Your Style with Premium Wool Suits in Kampala | Suits Avenue
Elevate Your Style with Premium Wool Suits in Kampala | Suits Avenue WhatsApp Us Now 🔥A New Chapter in Style: Wool Suits for the Aspiring

Discover the Elegance of 100% Wool Suits from Turkey at Suits Avenue | Kampala’s Finest Men’s Fashion
Discover the Elegance of 100% Wool Suits from Turkey at Suits Avenue WhatsApp Us Now 🔥Why Every Young Corporate in Kampala is Sporting a 100%

Discover the Latest Trending Wedding Suits in Kampala at Suits Avenue
Discover the Latest Trending Wedding Suits in Kampala at Suits Avenue WhatsApp Us Now 🔥Why Choose Suits Avenue for Your Wedding Suit?🏆 September 11th, 2023

Wool Blend Suits in Kampala: The Suits Avenue Exclusive
Wool Blend Suits in Kampala: The Suits Avenue Exclusive WhatsApp Us Now 🔥Introduction: The Timeless Elegance of Wool Blend Suits🏆 August 21st, 2023 In the